Thursday, June 13, 2013

Pottery Barn Knockoff Tile Board


Hey Everyone!


Guys!!!! It's been SOOOOooo crazy lately!  The contest has kept me Obber busy on top of work and I haven't managed to put together my project posts as Blog wars was going!  I'm so thrilled that I made it through the first round and I am able to present my entry for round 2 of Blog wars!


This round in blog wars we had to use some fabulous fabric that Riley Blake Designs sent us and I decided to do a organization board for our family command center.  Our house is in need of one since we are growing and have more and more appointments and notices that need to be left in plain site.  I'm in love with the one from Pottery Barn that you can find here.  But no way would I ever pay $500 dollars or even close to that for a command center that I could make myself.  So I did! and for a Fraction of that price!! :)

The List
Your going to need 9 tile boards I made 2 of mine and the rest you can get at (JoAnn's, Michael's, Or any other craft store that may carry them)

  • 4 Cork Tile boards 
  • Calendar Tile board
  • Chalk tile board
  • White Dry Erase Tile board
  • 2 Wood boards cut to size
  • Fabric 
  • Buttons
  • Thumb tacks
  • Mini Clothes Pins
  • Magnetic adhesive Buttons (Walmart)
  • Natural polished Hemp Twine
  • 10 Eyelet Screws
  • 2 8ft Natural Wood Molding 
  • 4x4ft plywood sheet
  • corner braces
  • Hot glue
  • Liquid Nail Glue
  • Brads Nail gun or a finish nail gun (We used Brads)
  • Paint
  • Screws

The first thing I did was make a "Pin it" (Pinterest) cork tile!  One of my favorites of the whole board.  I enjoy puns! ;)  I designed the template in Illustrator and then saved it as an SVG. file to cut out with my Silhouette Cameo.  I pined it to the board and then traced it with a gelled white pen. My paint color was a light color so I wanted it to disappear.  It took 2 coats to get a solid finish because the cork sucks up the paint.  But I love it!! :)  I then took the other 3 tile boards and covered them with fabric.  I used the Grey color that Riley Blake had sent me for Blog Wars and the other was just some that I had left over.


I then cut strips of the other fabric that Riley blake sent and some that I had and made Rosette flowers out of them.  You can find a great tutorial for that here. ( I used hot glue to make the rosettes )  I then took some thumb tacks and Magnetic buttons and hot glued them to my rosettes to make Thumb tacks and magnets out of them.  I also use the buttons that came in the Riley blake package and some others that I had in my studio and made thumb tacks and magnets out of those.


I took some of the fabric that was given to me and some that I had and made a fabric banner using one of the cute ribbons sent by Riley Blake. LOVE THOSE CARS!! :)  This was simply for decor.  I love to spruce up simple things. 


If you don't have 2 wood boards you can skip this step!  You will want to cut two boards to measure the length of your store bought boards.  Paint them however you want!  thats the fun part! :)  You can see I went for a whimsical rustic look. If you want to know how I did my painting technique, leave a comment and I will respond! :)  
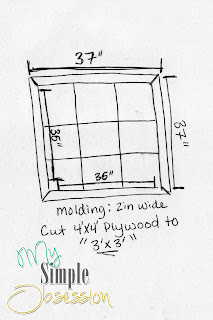

Next is the frame around the boards! You will want to lay all your boards out and measure from top to bottom on vertical and horizontal sides.  this will be the inner part of your frame!  I had my handy man (The Man) do all the dirty work for me since I'm pregnant.  But here is a fabulous tutorial of how to build a frame from molding. and beside is a picture of my doodle I laid out for "The man" to follow.   Hopefully you understand what I was trying to tell him.  and it should make your frame building and measuring easier. :)  Once your frame is built you will want to paint it or stain it to your liking and then you will take your screws and screw in your plywood backing to your frame.  This will create your layout to hot glue your tiles to.  Before you hot glue make sure you have your layout all figured out.  where you want to place the tiles and what not. Then apply a large dot of hot glue in each corner of your tile boards and stick in place.  Start in the corners, then the middle sides, and finally the very middle board.  I can't tell you enough to make sure you measure and double measure. if something is wrong or off then your tiles won't fit in your frame!  So double check the double checking. :)


The very last step is to measure out the placement of your eyelet screws for your wood tiles.  If you did not use wood tiles you can skip this and enjoy the final pictures! ;)  For those of you that did,  You will want to screw them in according to the spacing you see fit.  I did 3 clothes lines on my top tile board and 2 on my bottom.  However you can do as much or less as you like.  Once your screws are in, take your twine and tie a knot and pull tight and tie a knot on the other side.  Cut away the extra twine and then you can repeat for all the lines you wish to create.  Then just add your mini clothes pins.

There you have it!  Now you can decorate your board with all the tacks and magnets you have created and add pictures to your clothes lines and such. :)  If you have any questions regarding this tutorial or project please send me a message, email, or comment below!


Until Next time.. Keep creating, living, and obsessing!


Tuesday, May 21, 2013

DIY Super Hero Costume


Hey Everyone!


Round one results came in and I made into round two!  I want to thank everyone who voted, even if you didn't happen to vote for mine, I'm so thankful for your votes for the other tough competitors! For a look at the results you can hit up this link here!  I know I don't post pictures of my daughter on my blog, but I kind of had to take a picture of the costume  I made with her in it so you guys could see it from head to toe!  The Mask is by far my favorite part!  I fell in love with those pink eyelashes!  On to the project! :)

Friday, May 17, 2013

Round One Voting and NEWS!

Hey Everyone!


I submitted my project to Jonie at http://just-between-friends.com to the round one of Blog Wars.  I'm so terrified.  All the projects are so amazing.  It will be hard for everyone to pick their top 3.  I can't even decide! Hopefully you guys like mine.  Even though I can't tell you which one is mine or offer any hints.  All in all, it was so much fun creating my project and hopefully I am able to move on and keep processing out my ideas using all the amazing products the lovely sponsors have sent us to use.

In other words… If you follow along on our Facebook page most of you already know this.  But for those that just subscribe by email or other ways…….
Yes, I am pregnant!  Yay for babies! ;)
I'm 16 weeks along and finally feeling wonderful!  I've been so sick the first trimester I wasn't able to do much of anything, even CRAFT!- I know right!  I even had to shut down my shop for the time being, a whole 3 months!  But now, I'm able to keep food down and my weight is going back up.  Hard to believe I lost 10lbs the first trimester, but it's common with me.  With AB I lost 14lbs.  I will be giving updates on my pregnancy as time goes by.  Later this weekend I will start my first ever pregnancy post!  YAY! You will get to hear all my cravings, clothes shopping for maternity, and each week I will ask AB what she feels about baby becoming apart of our family.  I'm also a high risk pregnancy and will get into that all on the post.  I'm sure tons of ladies can relate!

Well that's all the news I have for now!  But get out there and vote!  Just follow the link below or click the picture above! 


Until next time, keep creating, living, and obsessing!


Monday, May 6, 2013

Blog Wars!

Hey Everyone!


Right around this time of the year there are all these amazing blog contests.  For crafty lovers like myself.  Most of you know I entered into one last year that was my very first.  The "One Crafty Contest"  And made it all the way to round 3.  This year I entered into Blog wars over at the "Just Between Friends" blog.  I am so excited because I love her blog!  And not only is every contest different but I just love coming up with ideas and completing them to show you all.  Now that I am in my second trimester and feel GREAT.  I get to get back to what I love doing. :)  So I entered into the contest and found out I made top 12!  How exciting is that!  The contest starts next monday so make sure you all follow along if you don't already.  You can click the link above and it will direct you to Jonie's lovely blog.  Also, on her blog it goes over the contest so you all know what to expect every week.  If you would love to go check out all the lovely contest sponsors, just head on over to this link here.


Thursday, May 2, 2013

Lamps.Com Contest and Giveaway!

Hey Everyone!


So I have some very exciting news for not only My Simple Obsession, but for our readers TOO!  Recently we were contacted by Lamps.com to enter into their DIY Chandelier Face Off.  

HOW COOL! Right?

I don't know about you all but I love lamps.com.  I am always on there looking for new lights when it comes to upgrading my standard builder grade lights.  My 3 year old and "the man" call them "Boobie Lights"- I know Right.  You know you all have thought it too.

.So Anyways.

Here is the cool part.  If we win, My simple obsession gets a $100 Gift card to Lamps.com and one of our lucky READERS will get a chance to win a $100 Gift card as well!  Awesome Right!  So here is what we have to do.  Go to this Link HERE and vote for the White beaded Chandelier.  There can only be one vote per email address.  If you have multiple address GREAT! The more the merrier! Also, Share, Share, Share.

The more that we get this out the better chance that we will be able to share the lucky prize with one of you!
Voting ends May 17th!

Currently I have my eye on one these beauties for my living room.


Which fixture from Lamps.com would you get if you won the $100 gift card?
Until next time keep creating, living, and obsessing.
So get out there and Vote!


Follow my blog with Bloglovin

Thursday, February 7, 2013

Buffalo Chicken Ranch Pasta

Hey Everyone.


So, today I want to share with you a recipe I found online and Love!  However I changed it up to suite my family's needs.  Here is the link to the Original recipe.

. Here is Mine .


THE LIST:

1 Box of penne pasta
1 Bag of Tyson Crispy Chicken Strips 
7 stalks of celery, diced
2 carrot stalks, diced
1/2 cup Frank’s buffalo wing sauce
1 cup of Walmart's Light buttermilk ranch dressing
2 tsp. onion powder

INSTRUCTIONS:

  1. In a large pot, bring water to a boil and cook pasta according to the package instructions and drain well when done.
  2. In the meantime, cook your chicken strips in the oven according to the directions on the bag. ( I cooked mine @ 400 for 19 Minutes )
  3. While the chicken is baking, combine Buffalo sauce, ranch dressing, and onion powder in a small bowl and set aside.
  4. Once chicken is done baking, remove from the oven and set aside on a cutting board. In the same pot as the pasta, throw in the celery and carrot and cook until tender. ( I used 1/4 cup of butter to sauté the veggies. )  While that is simmering, Chop up the chicken.  Then place the chicken back in the pot along with the sauce mixture.
  5. Let sauce simmer for 3-4 minutes then stir until well coated and all is combined.  Once done, grab some pasta and place on a plate with the Sauce/chicken mixture on top.
  6. Serve hot and drizzle more ranch sauce on top.


There you have it!  It's so yummy.  Even "The Man" approves.  He says, (And I quote) "That is M F ing A Mazing!" - Letters and all. ;)  I served ours with some Pepperidge Farm 5 cheese crispy bread.  Enjoy!  And I hope you all try it out for your family.


Until next time… Keep Creating, Living, And Obsessing!


Wednesday, February 6, 2013

Hot New App.

Hey Everyone!

Have you all had a chance to check out the amazing new website that is user friendly?  It's called The Inspiration Board.  Basically you can take all those ideas that you pin on pinterest and create a little inspiration board.  I know, your thinking, "But I already do that with pinterest!"  Well, What's great is the Inspiration board gives you a visual.  You can put them in a group to get a better look with color schemes, Design features, Shapes, and patterns.  Below are two boards I have created since it launched on Monday.  I would love to see your boards, Leave a comment with a link to your board.


Also,  the creator of The Inspiration Board.com is hosting a little giveaway for the launch of her website.  You all will want in on it because it has some awesome prizes up for grabs.  Below is a picture on how to create your inspiration board.  


Need a better how to? Check out the video on the website here.

To check out the giveaway and enter your inspiration board go to this link.


Until next time.. Keep creating, Living, and obsessing!!


Saturday, February 2, 2013

Giveaway and Visuals...

Hey Everyone!


So, Many of you might already know and have entered, I posted this on my Business Facebook page and the Blog Facebook page, but there is only one day left to enter and I wanted to make sure you all got your chance.  There are some amazing prizes to be won, Including yours truly. :)  Just click the picture above and it will take you there.  Good Luck! 

It has been an exciting last couple of weeks.  Guess who is getting MARRIED???!!!  That's right.  My fellow co-author Ashley!  How exciting.  We are going to be making a lot of the stuff for her wedding so It will be nice to share it all with you guys.  Today, I took her on a hunt for some cool vintage nic-nacs and Mis-matched China.  She is doing a Antique/ Rustic Theme.  
.LOVE.  
We also went to JoAnns so I could put a visual together so she could make a final decision on her color choice…. Up next is Making her Save the dates!  I can't wait to show you all what she has in mind.  They will be handmade. ;)  
Here is a look into the visual I laid out for Ashley. :)  This is all stuff we found at JoAnns.  We won't be using fake flowers, but I wanted her to see what her vision could look like. :)  Love that store.  


Which is your fave if you had to pick?  Can you guess which one Ashley likes?  :) I would love to hear what you all think! I know, But you will have to find out once we post about putting all of it together. 


Ive been so, SO, So busy with work the last 2 weeks.  Some how I over booked myself.  But I am all caught up and I now have set Business hours so I can get some stuff done around the house.  And also work on all those craft projects I miss doing….  Today, I am doing Laundry, which I hate, and putting some vinyl on the wood sign I made forever ago.  It's time That thing gets hung and featured on the blog…. Now, I just need a cute/personal/romantic quote to add to it…. Any Ideas?


Saturday, January 12, 2013

Free SVG Fridays?

Hey Everyone!

So, I've been seriously thinking about this Free SVG Friday.  Would you all be interested in getting a free SVG that I design in illustrator?  You would be able to use it with any craft cutter that accepts SVG files. ;)  Let me know in the comments below.

The Pinterest Follower giveaway is coming!  I'm slowly adding to that box.  So once its full I will post what's in it and start the giveaway! ;)

I've been so busy ya'll! I feel like everyone is having a birthday in February! haha  To say the least I will be slowing down on over booking orders for sure.  I've already had to turn so many of you down.  Thank you all for the great comments on my work!  Once that slows down I will hopefully be back with some tutorials.  "The Man" and I are working on my Office/Studio right now.  Getting the plans all in order to get this organized.  Its a chaotic mess!

How was everyone's holiday?  Mine was very busy.  I think I made almost 100 of those Grandkids signs in the shop.  Lots of lucky grannies out there! :)  Didn't leave much time to actually enjoy it.  Well that is my update for now. boring.. I know.  But that's my life right now. haha.  Work, AB, Work, "The Man", Oh and AB's 3rd birthday is coming up. YIKES!  I think we are doing the Chuck e' Cheese thing this year. :)  We Shall see….


09 10